Deploy Strongswan On Azure Part1
Deploy StrongSwan in Azure for IPSEC VPN tunnels to On Prem
StrongSwan is a powerful open-source IPsec VPN solution that runs directly on Linux. In this post, we will deploy it in Azure to connect an Azure virtual network to an on-premises environment using a Cisco IOS-XE router. For this lab, we will configure a policy-based VPN rather than a routed (VTI) VPN, as it is generally easier to get working initially with StrongSwan.
IPSEC
IPsec is a group of network protocols that create a secure connection between two or more devices by authenticating and encrypting packets over Internet Protocol (IP) networks such as the Internet. To establish a Virtual Private Network (VPN) tunnel between devices, IPSec uses multiple protocols, including the following.
- Encapsulating Security Protocol (ESP): Encrypts and optionally authenticates the IP payload. In tunnel mode, ESP encapsulates the entire original IP packet inside a new IP header.
- Security Association (SA): Negotiates encryption keys and algorithms between devices in a tunnel using protocols such as Internet Key Exchange (IKE), and the Internet Security Association and Key Management Protocol (ISAKMP)
- Internet Key Exchange (IKE) IKE is responsible for negotiating and managing Security Associations. It establishes the control channel used to securely exchange keying material. I like to think of this as the control plane for IPsec.
The Two-Phase Negotiation Process:
Phase 1: IKE SA (ISAKMP SA) - The Control Channel The goal of Phase 1 is to Create a secure, authenticated management tunnel between the two peers.
- Choose encryption and integrity algorithms
- Select Diffie-Hellman group
- Define authentication methods (PSK or certificates)
- Establish a secure channel for Phase 2 negotiations
Phase 2: IPsec SA (ESP SA) - The Data Channel The goal of phase 2 is to Negotiate how actual user traffic will be encrypted.
- Choose encryption and integrity algorithms for ESP
- We will also deine the traffic that is being encrypted with traffic selectors
- Establish one or more IPsec SAs for data transfer
NAT Traversal (NAT-T) in IPsec
We are going to have a router that is sitting behind a firewall so I breifly waneted to bring up NAT-T as ESP cannot traverse NAT without a little bit of help. Traditional IPsec uses Encapsulating Security Protocol (ESP), which is IP protocol 50. Unlike TCP or UDP, ESP does not use port numbers. What NAT-T does is encapsulates ESP inside UDP using port 4500. Now instead of the firewall or NAT device seeing the ESP packet it will see UDP prt 4500 and we can take advantage of the UDP ports fot NAT.
The Lab Topology
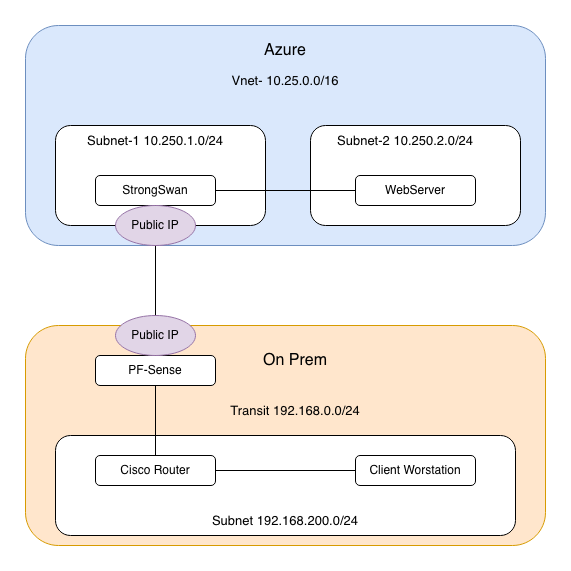
- Azure Virtual Network: 10.250.0.0/20 address space with a 10.250.1.0/24 subnet and a 10.250.2.0/24 subnet
- StrongSwan VPN Server: Ubuntu 22.04 VM in Azure with a Public IP address from Azure
- PF Sense Firewall: Public IP address
- Cisco Router: Acts as IPsec initiator with private IP 192.168.0.29 sitting behind the Firewall
- On-Premises Network: 192.168.200.0/24
Setting up Ubuntu in Azure
For this part, you will need an Azure account. Once that is set up, launching a VM is straightforward. I will assume a basic level of Azure knowledge.
- Create a new Resource Group
- Create a new VNet in the resource group (I used 10.250.0.0/16)
- Create two subnets in the VNet:
- 10.250.1.0/24 = External
- 10.250.2.0/24 = Internal
- Create an Ubuntu VM (I used Ubuntu 22.04)
- Create a Public IP address
- Configure an NSG allowing:
- UDP 500
- UDP 4500
- TCP 22 (SSH)
- Create two NICs:
- One attached to the Public IP
- One attached to the internal subnet
- For this demo, I used a username and password instead of certificate authentication to the VM over SSH
Setting up StrongSwan
After the Vm is launched you are ready to install StrongSwan. Lets SSH into the VM and get it set up.
Update your VM
sudo apt update
Install StrongSwan and all required packages.
sudo apt install strongswan strongswan-pki libcharon-extra-plugins libcharon-extauth-plugins libstrongswan-extra-plugins –y
Enable StrongSwan to start at boot.
sudo systemctl enable strongswan-starter.service
Start StrongSwan.
sudo systemctl start strongswan-starter.service
Verify that the StrongSwan daemon is up and running.
sudo systemctl status strongswan-starter.service
Lets configure our VPN parameters. By default StrongSwan stores the configuration in /etc/ipsec.conf so lets go edit that file using nano.
sudo nano /etc/ipsec.conf
config setup
    charondebug="ike 1, knl 1, cfg 0"
    uniqueids=no

conn myvpn
    # Connection type
    type=tunnel
    auto=start

    # IKEv2 settings
    keyexchange=ikev2

    # Phase 1 (IKE) parameters matching Cisco proposal
    ike=aes256-sha256-modp2048!

    # Phase 2 (IPsec) parameters matching Cisco transform-set
    esp=aes256-sha256!

    # Authentication
    authby=psk

    left=%any
    leftid={public-ip on StrongSwan}
    leftsubnet=10.250.1.0/24,10.250.2.0/24

    right={public-ip of on Prem Firewall}
    rightid=192.168.0.29
    rightsubnet=192.168.200.0/24
    ikelifetime=8h
    lifetime=1h
    margintime=9m
    rekeyfuzz=100%
- keyexchange=: Method of exchange to use in the IPsec connection, ike defaults to ikev2, ikev1 assigns IKEV1 to the connection.
- authby=: This is the method used to authenticate, we can use a PSK or Cert. I will choose a PSK for this example
- left=: The local server’s public IP address.
- leftsubnet=: IP address range that you need connection to
- leftid=: How the Azure VM will authenticate
- right=: The Remote Server’s public IP address. This will be our On Prem network
- rightid=: How the remote On-Premises server authenticates.
- rightsubnet=: The Local On-Premises network behind the Cisco router
After this we will also need to create a file that has our preshared key in it. This is normally in /etc/ipsec.secrets so lets edit edit that file. be sure to replace “MY-KEY” with your own PSK.
sudo nano /etc/ipsec.secrets
%any %any : PSK "MY-KEY"
We need to enable IP Forwarding to allow the VM to act as a router and forward ip packets:
sudo sysctl -w net.ipv4.ip_forward=1
Lets reload the configuration and StrongSwan is ready to go:
sudo ipsec reload
sudo ipsec restart
Cisco Configuration
We are going to use Crypto Maps on a Cisco router to terminate the VPN on our On Prem environment. This will connect the networks 192.168.200.0/24 to 10.250.1.0/ and 10.250.2.0/24.
Create the Phase 1 (IKE) proposal and define the required encryption algorithm, authentication method, and Diffie-Hellman (DH) group. Attach this proposal to an IKE policy.
Next, create the IKEv2 profile. Set the remote identity to the public IP address of the StrongSwan peer. Because the Cisco router is behind a NAT device, you should also configure a local identity. The local and remote identities configured on the Cisco device must match the leftid and rightid values defined in the StrongSwan configuration. If these values do not match exactly, IKE Phase 1 negotiation will fail.
crypto ikev2 proposal prop-1
 encryption aes-cbc-256
 integrity sha256
 group 14
!
crypto ikev2 policy policy-1
 proposal prop-1
!
crypto ikev2 profile profile-azure
 match identity remote address {public ip of StrongSwan}
 identity local address 192.168.0.29
 authentication remote pre-share
 authentication local pre-share
 keyring local keys
Create the Pre Shared Key, here you should replace “MY-KEY” with your own key. It is also best practise to add the Public IP of the connecting device here instead of allowing any address like I have here.
crypto ikev2 keyring keys
 peer azure
  address 0.0.0.0 0.0.0.0
  pre-shared-key MY-KEY
Now lets create our Phase 2 Encryption and Authentication parameters.
crypto ipsec transform-set t-set esp-aes 256 esp-sha256-hmac
 mode tunnel
Next we need to make that Access-list that will be used to idneitfy interesting traffic or traffic that needs to be encrypted. This is what is used for the traffic selectors for the VPN tunnel
ip access-list extended azure
 10 permit ip 192.168.200.0 0.0.0.255 10.250.1.0 0.0.0.255
 20 permit ip 192.168.200.0 0.0.0.255 10.250.2.0 0.0.0.255
Lastly we will create the Crypto Map and attach it to an interface. This is what ties everything together, we referance the Transform set we, the Ike Profile, and the access list for traffic to encrypt. Reverse route injection is used to add a static route to the routing table for the subnets 10.250.1.0/24 and 10.250.2.0/24.
crypto map map-2 10 ipsec-isakmp
 set peer {Public IP of StrongSwan}
 set transform-set t-set
 set ikev2-profile profile-azure
 match address azure
 reverse-route static
!
interface Ethernet0/1
 ip address 192.168.0.29 255.255.255.0
 crypto map map-2
Verify
Everything should now be operational. Let’s verify that the tunnel is up and working by performing ping tests and checking show commands.
Ping test from the StrongSwan
michael@strongswan-vm:~$ ping 192.168.200.1
PING 192.168.200.1 (192.168.200.1) 56(84) bytes of data.
64 bytes from 192.168.200.1: icmp_seq=1 ttl=255 time=21.2 ms
64 bytes from 192.168.200.1: icmp_seq=2 ttl=255 time=21.7 ms
64 bytes from 192.168.200.1: icmp_seq=3 ttl=255 time=21.5 ms
64 bytes from 192.168.200.1: icmp_seq=4 ttl=255 time=21.6 ms
^C
--- 192.168.200.1 ping statistics ---
4 packets transmitted, 4 received, 0% packet loss, time 3005ms
rtt min/avg/max/mdev = 21.218/21.514/21.746/0.193 ms
Check the SAs on the StrongSwan, we can see the Phase 1 is up and both the Phase 2 tunneles are installed
sudo ipsec status
Security Associations (1 up, 0 connecting):
       myvpn[1]: ESTABLISHED 10 minutes ago, 10.250.1.4[168.62.164.80]...64.147.204.233[192.168.0.29]
       myvpn{1}:  INSTALLED, TUNNEL, reqid 1, ESP in UDP SPIs: c1f9226a_i 47c3d804_o
       myvpn{1}:   10.250.1.0/24 === 192.168.200.0/24
       myvpn{2}:  INSTALLED, TUNNEL, reqid 2, ESP in UDP SPIs: c3059f49_i 2577b15a_o
       myvpn{2}:   10.250.2.0/24 === 192.168.200.0/24
Ping test from the On Prem Side
R1#ping 10.250.2.4 source 192.168.200.1
Type escape sequence to abort.
Sending 5, 100-byte ICMP Echos to 10.250.2.4, timeout is 2 seconds:
Packet sent with a source address of 192.168.200.1
!!!!!
Show crypto sessions gives us a nice overview of the tunnel
show crypto sessions
Interface: Ethernet0/1
Profile: profile-azure
Session status: UP-ACTIVE
Peer: 168.62.164.80 port 4500
  Session ID: 10
  IKEv2 SA: local 192.168.0.29/4500 remote 168.62.164.80/4500 Active
  IPSEC FLOW: permit ip   192.168.200.0/255.255.255.0 10.250.1.0/255.255.255.0
        Active SAs: 2, origin: crypto map
  IPSEC FLOW: permit ip   192.168.200.0/255.255.255.0 10.250.2.0/255.255.255.0
        Active SAs: 2, origin: crypto map
Phase 1 on the cisco router
show crypto ikev2 sa
Tunnel-id Local                 Remote                fvrf/ivrf            Status
1         192.168.0.29/4500     168.62.164.80/4500    none/none            READY
      Encr: AES-CBC, keysize: 256, PRF: SHA256, Hash: SHA256, DH Grp:14, Auth sign: PSK, Auth verify: PSK
      Life/Active Time: 86400/640 sec
      CE id: 1015, Session-id: 5
      Local spi: FFA945D98B0C8A2F       Remote spi: 535C9117E3DAA3AC
Phase 2 on the cisco router, here we want to look for encapslation by looking at the pkts encrypted and decrypted. Here we see the 2 sperate tunnels used for data transmission are both up and working.
R1#show crypto ipsec sa
interface: Ethernet0/1
    Crypto map tag: map-2, local addr 192.168.0.29

   protected vrf: (none)
   local  ident (addr/mask/prot/port): (192.168.200.0/255.255.255.0/0/0)
   remote ident (addr/mask/prot/port): (10.250.1.0/255.255.255.0/0/0)
   current_peer 168.62.164.80 port 4500
     PERMIT, flags={origin_is_acl,}
    #pkts encaps: 10, #pkts encrypt: 10, #pkts digest: 10
    #pkts decaps: 10, #pkts decrypt: 10, #pkts verify: 10
    #pkts compressed: 0, #pkts decompressed: 0
    #pkts not compressed: 0, #pkts compr. failed: 0
    #pkts not decompressed: 0, #pkts decompress failed: 0
    #send errors 0, #recv errors 0